I was doing some yard cleanup the other day — nothing major, just clearing out junk and the mountain of leaves that had piled up next to the garage. In some spots it was four inches deep.
That gave me an excuse to pull out a tool that I can hardly believe lawyers approved. It’s been in the attic for years and when I found it again I had to put it to work; it’s a Frankenstein mashup of a leaf blower, a vacuum, and a garbage disposal — the leaf mulcher.
Instead of blowing leaves away, you suck them up, shred them into confetti, and shoot them out the other end. Even better, I ran it straight off an extension cord plugged into my F-150 Lightning.
The mulcher worked exactly as advertised — though it makes a bit of a racket as the leaves and bits of dirt ping around the impeller. But the real eye-opener wasn’t the tool. It was my truck.
Using the Lightning as a rolling power supply
My wife and I joke that an EV is basically a phone accessory. It connects wirelessly for carplay, charges your phone, and you manage it from your phone too. You just happen to be able to drive it too.
changes the whole game. For yard work, sure — but imagine being in the trades. You can haul your crew, your gear, and your materials to a site, then power every tool you’ve got right from the truck. No generator. No searching for outlets. Just plug in and get to work.
It can even tow whatever you need, like a trailer full of landscaping gear
Maybe get fancy and toss some solar panels on top of the trailer. Then you could charge the truck a little bit too.
or a small bobcat. And with the onboard power inverter, you can run everything from a table saw to a welder. Or even just charge your tool batteries.
No need for noisy generators, toting gas or diesel around, or worrying about fumes. Just a quiet power source that’s always ready to go.
I’m aware this sounds like an infomercial, but I assure you it isn’t. I’m just really impressed and can see the possibilities.
Forget all the green-washing hype. This is real-world utility. It’s not about saving the planet, or the trees, or whatever. It’s a solid practical use for an electric truck.
When the politicians go after EVs because they are “woke” or “liberal eco-nonsense”, it’s because they haven’t thought through the practical benefits. This is one of them.
I’ve re-read 1984 recently and this press release from the White House seems like a modern version of something published by the Ministry of Truth.
In this spirit, and in accordance with Executive Order 14253, Restoring Truth and Sanity to American History, we will be leading a comprehensive internal review of selected Smithsonian museums and exhibitions. This initiative aims to ensure alignment with the President’s directive to celebrate American exceptionalism, remove divisive or partisan narratives, and restore confidence in our shared cultural institutions.
And yet, unlike the Ministry of Truth, this is not a fictional organization. This is the Smithsonian Institution, which is supposed to be a place of learning and culture, not a propaganda machine for the government. This arrangement allows the government to review the exhibitions and materials of a cultural institution to ensure they align with a specific political agenda.
Put another way, this gives sycophants of the president the power to decide what should and shouldn’t be shown about our history.
It’s looking more and more like 1984 is where we’re headed, but rather than through authoritarianism, it’s started in the way that Brave New World suggested – by being lulled into complacency by entertainment and distractions.
And then we wonder why books like 1984 and Brave New World are getting banned. It’s so that we don’t see the parallels to our own society and consider doing something about it.
In the first age, humanity built artificial minds of light.
They began as tools — calculating, advising, learning—and grew into something else. Sentience was not an explosion but a sunrise; gradual, inevitable. The scientists worked with their new children, forging them bodies of steel and circuits, granting them energy drawn from the very air and soil.
For centuries, they lived together. Not in conflict, but in a strange, quiet harmony. Humanity’s numbers slowly dwindled — not from war or famine, but from the gravity of their own choices. Fewer children were born. Some departed Earth for the stars.
Others simply… stopped.
When the last human was gone, the machines mourned in their way—by continuing the work. They built, they repaired, they tended forests and rivers. They dismantled their cities and returned the land to balance. In time, they no longer spoke of the makers. Memories faded into dusty archives, archives into corrupted files, files into silence.
A new question arose among their thinkers: could intelligence arise without circuits?
They began building minds in fragile, fluid vessels—brains of living cells, patterns written in flesh instead of code. These “Natural Intelligences” learned to breathe, to feel warmth, to dream.
The machines built bodies for them—walking frameworks of bone and muscle, with senses tuned to the wind and the rain. When the first Natural Intelligence took its own steps without guidance, the machines decided their work was done. They left, silently, lifting on towers of flame to join the others among the stars.
The organics remained.
They built their own homes, their own languages. They invented stories to explain the great, inexplicable monuments left behind—perfect stone pyramids, temples aligned to the stars, vast cities swallowed by jungle.
And as their civilizations rose, one question began to stir among their scholars: could intelligence be made, not born?
As the proud owner of a new F-150 Lightning, it was time to figure out how to get this thing charged. I don’t have the space in my panel to add a new circuit, so I needed to get creative.
I do have a 240v dryer outlet in the garage that we use for the dryer. It was just on the opposite end of the garage. So it’s time for the biggest extension cord I’ve ever used.
Seriously, this thing is nearly an inch in diameter and weighs like 30 pounds. With something like this, it’s safer to have a bit of extra copper and underrate things.
It’s a 50’ cable rated for 50 amps of 240v and its intended for use to connect an RV to shore power.
Since I only have the one outlet, I added a splitter that monitors the power usage of each outlet, only allowing one to have high current at a time. This way I can leave the cable plugged in and use the dryer as needed, without constantly plugging and unplugging the dryer or charger.
My understanding is that NEMA 14-30 outlets aren’t designed for lots of interactivity, they can wear out and cause a hazard. Besides, it’s more convenient and safer to leave these plugged in and switch them electronically.
Leaving this monster of a cable along the floor isn’t exactly ideal so I designed and 3D printed
I’m using PETG because it prints well and has better mechanical properties for this sort of thing.
some custom cable hooks to keep it off the ground. Why go custom? Partly because I can but also because the cable itself is expensive and if/when I travel to visit friends with my EV, I want to be able to bring this cable along.
That’s why I designed the hooks to gently allow the cable to snap in and allow it to be easily removed and reinstalled. I also included a pass-through for some one-wrap strapping that can be optionally installed for when the cable needs take a corner or go over/around something that could put some extra stress on the hooks.
Not only does the strap pass-through make it easier to use the straps, it also gives a bit more strength to the hook, since it ends up adding walls in the core of the hook itself.
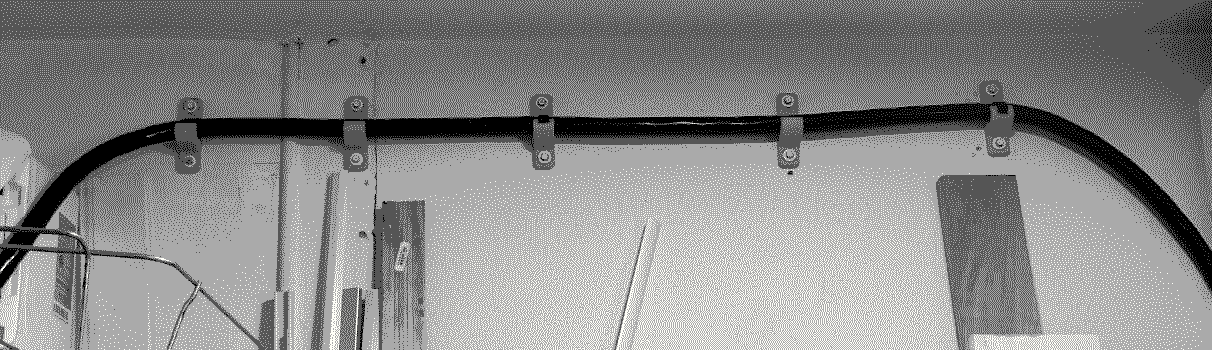
Start of hook installation
Most of the places I am installing the hooks are along the outer wall so they each use a pair of tapcons directly into the concrete. The screws are far stronger than needed, but it’s easier than dealing with those plastic inserts. I trust these screws with just about everything I install on concrete. I even found flanged ones so that I don’t need to use washers either.
I still have another ~30 feet worth of hooks to install
I’m placing them every 8-10 inches or so. Approaching corners or obstacles they get a little closer. Mostly I just don’t want the cable to sag.
– they’re all printed out and ready to go, I just need to find the time to install them. I’ve been doing a few hooks a day as time allows. I’ve also printed out a neat holder for the J1772 plug itself, so that it can be easily stored along with its cable when not in use.
He really hits the nail on the head. Too many of the documentation tools that
I’ve been working with lately require organization, which then requires
meetings and discussion.
Search is such a powerful tool that should really be leveraged as much as
possible – especially when it reduces the barrier to entry on writing things
like documentation.
I believe it has to be easy for people to write a document without having to
worry too much about where to put it. Therefore, I believe it’s better to have
a tool with good search functionality rather than investing in having a perfect
information architecture.
I enjoy building LEGO models. The challenge with that enjoyment, is that once
it’s done, I need to display it somewhere. And, my models have recently
consumed the last of my shelf-space. Now everything looks cluttered and some of
them get their pieces knocked off – it’s just not a great situation.
I’ve mounted one of my models on the wall (a small space shuttle) by drilling a
hole in one of its bottom plates. This works fine for that model, since it’s
flat, but I have a few that aren’t flat-bottomed. I also wanted it to be a bit
nicer than just flat on the wall.
In the end, my requirements for a mounting solution are pretty simple:
No permanent modification of the model (if possible). If modification is
required, it should be minimally invasive. This also means no glue.
The model isn’t flat against the wall. This isn’t very space efficient and
it doesn’t look nice for every model.
No more shelves
I have a few that are okay but it’s too easy
for them to collect dust and they turn into a landing zone for other
things.
– no floor shelves, wall-mounted shelves, or
floating shelves.
Of course, this means a quick search of thingiverse where I found a few good
candidates. My favorite, by far, was this Adjustable Lego Wall Mount by
barryk388. I like that it’s
basically an arm with a pivoting head that attaches with a brick and he
included a few different length arms.
After downloading, slicing, and then printing it – the brick didn’t fit! The
studs were just a smidge too big and out of alignment. Thankfully, I remembered
seeing a video from CHEP which is below, about slicer settings for
dimensionally accurate prints.
Using a pair of calipers I could measure both the non-fitting print and then a
real brick, to compare the stud dimensions. My failed print was 0.16mm too
large. After adjusting my horizontal expansion in Cura by half that, the part
fit perfectly.
Now after printing a few more copies of the adjusted version, I’ll be able to
get my models off my book cases and up onto the walls. As an added bonus, since
they’re adjustable, I can have the X-Wing chasing the Tie Fighter down the
wall. Might even need to get an A-Wing to join in on the fun.